
Learn how to transform or repair your Samsung Galaxy smartphone by following this guide.
In order to root your Samsung Galaxy J7 (or any other Samsung Galaxy device), you need to know how to use Odin with your smartphone device.
The process of flashing your smartphone’s firmware is fairly simple. Using the Odin Flashing Tool you can flash your firmware, kernel, and other images.
And don’t worry about being a tech junkie to follow the procedure, anyone who has used a Samsung Galaxy Android phone for some time can handle everything that is involved with using Odin on your smartphone device.
Of course, you will need to understand some concepts first but generally the Odin process comes naturally to smartphone users.
If you know nothing about Odin then you don’t need to worry either since we’ll take you from scratch to rooting your smartphone yourself without giving tons of money (relatively speaking) to your local repair shop.
With that said, it is also true that even some self-proclaimed pros make trivial mistakes while flashing their smartphones and that can lead to permanent problems as far as the operating system on their smartphone is concerned.
Remember, if you make mistakes in using Odin with your Samsung Galaxy device then there is a reasonable chance that you might end up with a bricked Samsung Galaxy smartphone.
And since Samsung Galaxy smartphones don’t come cheap, even the entry level smartphones, you don’t want to lose money on your device just because you couldn’t follow the Odin process carefully enough.
What is Odin?
Odin is a software that is used to flash firmware of smartphones such as Samsung Galaxy J7. It is a windows based tool which provides users with a complete one-click solution to all their firmware related problems.
It can also be used for your kernels. Basically, it is a very versatile tool that is, now, extensively used in the smartphone do-it-yourself community.
Odin is a very special tool and truth be told, there is no way a tool as useful as Odin could ever be available for free download on the internet. It is only through the relentless efforts of the hacking community that Odin was released on the internet for free.
Millions have downloaded the tool so far and hence no one can demand a premium price for Odin anymore.
As mentioned before, Odin is used to flash kernels along with firmwares and ROMs. But that’s not all, the tool can also be used to operate on other files that come in .tar and .tar.md5 format.
Odin is a standalone package that is completely executable. It is quite an accomplished piece of software and hence doesn’t need any extensions to work properly.
The Odin tool is easy to use and simple in its design.
In short, if you want to customize your Samsung Galaxy smartphone or want to protect your device from various hazards, then Odin is the tool you need to use.
Why Do We Need Odin?
Well, most Android users want to change their firmware to something more exciting on a regular basis. Needless to say, it is quite a dull experience if you’re stuck with a single version of ROM or firmware for the rest of your life on a particular smartphone.
If you change your smartphone’s firmware on a regular basis, you wouldn’t want to buy a new smartphone as quickly as you do now.
And most of all, things such as customs ROMs and flash kernels are cool because they improve the performance of your smartphone device.
Also, if you work in the field of Android development then you’ll need to perform a ridiculously high number of flashes in order to install new ROM or kernel on various different mobile devices.
In short, Odin is a heaven-sent program when it comes to repairing and restoring bricked Android smartphones like Samsung Galaxy J7.
Just to give you an example, say that you somehow corrupt the partition table of your smartphone device which resulted in a bricked (hard or semi-hard depending on how badly you messed up) smartphone device.
Odin can and will restore your smartphone device by repairing the partition table using the .pit file which has all the information about the partition tables of a specific device.
Moving On to The Ways You Can Flash Firmware Using Odin
Before we move on to the actual process, a word of warning: Odin only works on Samsung Galaxy devices such as Samsung Galaxy J7.
Don’t try to use it on any other device, like an iPhone or Blackberry (though the blackberry is an Android smartphone now).
Always take the necessary precautions before you begin to flash any firmware.
Choose the correct firmware builds because incorrect firmware version can and will result in a bricked Samsung Galaxy device.
Always make sure that you’re using a firmware version that is compatible with your device. This should be done before beginning the process of flashing.
If you flash your firmware successfully (or even unsuccessfully since it doesn’t matter in the end), you will definitely throw out your device’s warranty claims.
Needless to say, flash your smartphone device at your own risk. You are responsible if everything goes well and you’re solely responsible if everything goes down the drain and you end up with a bricked device.
Technologypep or any of its associates shall not be held responsible if there is any damage to your Samsung Galaxy device as a result of flashing its firmware.
Scared enough already?
Don’t worry. This guide should make everything straightforward and simple.
Prepare to Tame Odin For Your Samsung Galaxy J7 (Or Any Other Device)
First, Charge Your Samsung Galaxy Device Sufficiently
As mentioned before, you can easily flash your Samsung Galaxy smartphone if you follow the procedure with some care but flashing stock firmware is always a risky process.
If you’re not paying enough attention, you might end up with a broken device which is the greatest of experiences.
Make sure you understand all the prerequisites and installation steps before you even begin to prepare your device for flashing.
You don’t need an oracle to tell you that bad things will happen to you if you don’t charge your smartphone sufficiently before beginning the flashing process.
Imagine the damage caused to your smartphone device it the battery runs out in the middle of the flashing process. We don’t want that.
So, in order to avoid ending up with a hard-bricked device, make sure your Samsung Galaxy device is at least 60% charged if not a 100% charged.

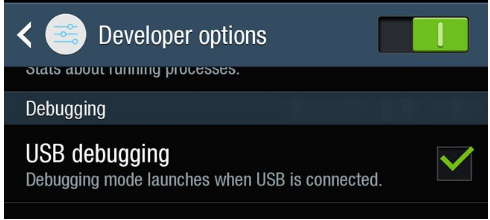
Go Ahead And Enable USB Debugging Mode On Your Samsung Galaxy Device.
Probably the most important step in the entire process before you actually begin to flash your firmware or recover a file is enabling the USB debug mode.
USB Debug mode enables your Android device to get ready for downloading and sending data over a USB connection, with a cable, to your computer.
To turn on the USB debugging mode,
- Go to Settings menu on your device
- Then go to About Device
- Then go towards the bottom of the page until you find the Build number for your device
- Tap the Build Number seven times in succession
- When the message “Developer Mode Has Been Enabled” appears, it means that your device has turned on the debugging mode.

- After you’ve done then, go back to Settings menu
- Find the new option Developer Options in the Settings menu
- Tap Developer Options
- Go to USB debugging option
- Check the box next to it in order to enable USB debugging mode

USB Driver Installation On Your Samsung Galaxy Device
Most modern Samsung Galaxy devices have USB drivers installed by default. You may also have Samsung Kies already installed on your desktop PC or laptop.
If you haven’t got any of those two things then worry not, just follow the instructions that follow.
First, make sure you have Samsung Kies installed on your computer.
Then make sure it isn’t running while you use Odin.
Samsung Kies must not be running while you flash your smartphone’s firmware or it might disturb the entire process.
Download Samsung USB Drivers And Kies From here
Make Backups For Samsung Galaxy’s Data And Apps
Normally your smartphone’s data, settings, and applications remain safe while installing a custom ROM, flashing a firmware, inserting a new ROM and rooting.
But, as is with things in the real world, sometimes, they might get compromised. In fact, they might be get wiped out from the face of this earth without a trace.
So, in your best interest, you should backup all your applications along with your contacts and messages. Don’t forget any other content such as photos,videos and other private information that is stored on your smartphone’s internal storage.
Just do a quick Google search and download a good backup application that can help you keep your data safe.
Download Odin For Your Samsung Galaxy Device
Now you need to download the workhorse of this operation. That is, the Odin tool. You will use the Odin tool to flash the firmware of your Samsung Galaxy J7 (or any other Samsung Galaxy device) device.
The internet is filled with different versions of the Odin tool but the most effective on is, without a doubt, Odin3 v3.09.
This is the version that has proven itself across a variety of Samsung Galaxy devices.
Though if you have upgraded to Lollipop Android version then Odin3 v3.10.6 is your best shot.
Download Odin (all versions) here.
Time To Download Samsung Galaxy Device’s Firmware
You must ensure that you’re downloading the correct firmware build for your Samsung Galaxy device.
The correct firmware version can be easily found from your device’s model. The two numbers should match in order for you to progress to advanced stages of this process.
Your smartphone’s device model and country (from where you bought the smartphone in the first place) and the place from where you’re using the smartphone can easily be found by going to the Settings menu.
When you go to the Setting menu, then looks for the option labeled About Device.
After that, go to Model Number and write it down someplace safe and convenient.
You also must find out the CSC number of your specific smartphone device.
CSC codes are basically tied to your network operator and your region/country.
Here is a guide to show you how to change your CSC code.
=====================
The process can go much faster if your smartphone device isn’t a branded version (like if you bought it on a contract from a specific carrier such as Orange or Verizon). It will also be much easier for you to follow this process if your device isn’t SIM locked.
If that is indeed the case, then you can install any firmware (branded or unbranded) that is compatible with your smartphone’s model. The CSC number, in this case, will not matter at all.
With that said, if your smartphone is indeed carrier branded then you must download a firmware (and install it) that matches the CSC code of your specific Samsung Galaxy smartphone or tablet.
Otherwise, you run the risk of bricking your device forever.
You can download a large variety of firmwares for most Samsung Galaxy smartphones from these websites,
Now You Should Reboot Your Samsung Galaxy Device Straight Into Download Mode
You must run your smartphone on either Bootloader mode or Fastboot mode in order to flash factory installed firmware or images.
Lucky for you, Samsung Galaxy devices come pre-installed with a Download Mode feature that equips your Samsung Galaxy smartphone to automatically receive data from your desktop PC or Laptop via Odin, the special flashing tool we mentioned before.
If you don’t know how to boot your Samsung Galaxy device into Download Mode then read on.
First, turn off your Samsung Galaxy device.
Then, press and hold the Volume Down button + Home + Power Button simultaneously for a few seconds.

Soon your smartphone will show you a warning screen that will have a yellow warning sign at the bottom.
When you see that screen, you need to press Volume Up button in order to enter Download Mode.
Sometimes, the Download Mode is also called the Odin Mode. So don’t get confused.
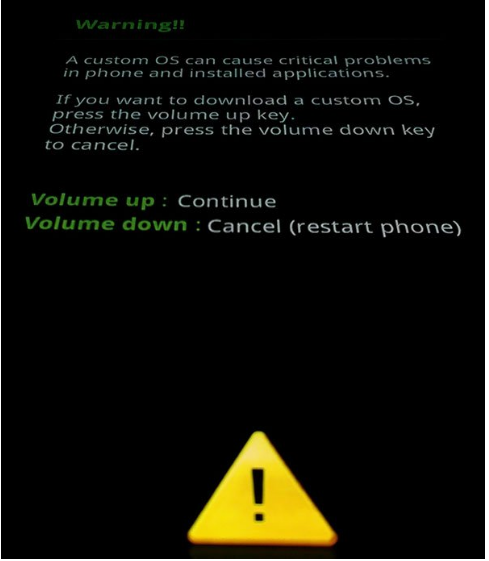
When your Samsung Galaxy device goes into Odin Mode, you will be able to advance further into the more complex parts of the process.
You will also be able to install the new firmware that you downloaded in the previous step. We’ll come to that in a bit.
The Download Mode also allows your device to install on itself CF-Auto_root and CWM/TWRP recovery file.
Pretty neat right?
Have a look at the screenshot below to get a better understand of how the Download Mode screen looks like on a Samsung Galaxy device.
–
You might already know this but reminder never hurt (or do they?): Samsung Galaxy devices allow “flashing firmware” operation only with .tar and .tar.md5 extension files. You already know that Samsung Galaxy devices are only compatible with Odin as far as flashing firmware is concerned.
Time To Install Stock Firmware On Your Samsung Galaxy Smartphone
So, you should have downloaded a compatible version of the firmware for your Samsung Galaxy J7 (or whichever Samsung Galaxy device).
- Make sure it’s a zip file.
- Extract the zip file so that you can use the actual firmware file with the .tar.md5 extension. You can also flash a custom recovery file like CWM or TWRP. If you do then know that the files for those two also come in .tar and .tar.md5 extensions.
- Now, Download the latest compatible version of Odin zip file. We’ll use 3.09 for the purposes of this guide.
- Extract the Odin file on your desktop computer or laptop. You should get two files named Odin3 vx.xx.exe and Odin3.ini
- Open an Odin windows by clicking on the Odin3 vx.xx.exe file
- Turn off your smartphone device
- Boot your smartphone into Download Mode as described above
- Now you should connect the Samsung Galaxy smartphone to your desktop PC using a USB cable. If you have the OEM one then that’s great.
- When your device makes a connection with your computer, the ID: COM port on Odin will change its color from a default color to either Blue or Yellow. The final color is dependent on the Odin version.
- Witness the “added!!” message to know that Odin and your smartphone have connected successfully

Bad things happen to good people too. In other words, it is entirely possible that your smartphone device was not detected by Odin software.
If that is indeed the case then do the following:
- First, reboot your smartphone
- Turn off USB Debugging Mode
- Turn your phone on again
- Uninstall Samsung USB Drivers or Samsung Kies
- Reinstall Samsung USB Driver or Samsung Kies
- Reboot your desktop computer or laptop
- If possible, change USB cables. Change ports too if Odin still doesn’t recognize your smartphone. Do this after you have installed new drivers.
- Replace your current USB cable with another one
Odin and your Samsung Galaxy smartphone should be connected now.
If you are running Odin3 v3.09 or even 3.10, then click the AP button on your screen.
If your Odin version is older than the one we’re using, then click on the PDA button.
Then, navigate to the firmware/recovery file.
After that, select the .tar/.tar.md5 extension file.
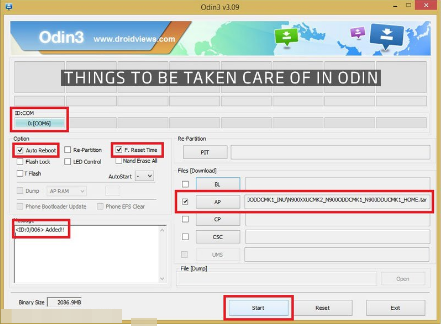
If you come so far then you should know that for multiple file firmware builds which come with AP,BL,CP,CSC, and .pit files, you should use the image shown below to add individual firmware components to their respective slots in the Odin software.

Now, go to the Options menu and check the boxes for Auto Reboot and F.Reset Time. Uncheck all other boxes.
Never check Re-Partition box if you don’t intend to use .pit file to flash. It can lead to big problems such as corrupted partition table.
Double check all fields with the image shown above before starting firmware/recovery process on odin.
Everything looks fine? Great. Moving on then.
Now, hit the Start button on Odin screen to initiate the process of installation.
The installation process will take a few seconds if you’re using CF-Root or a recovery file.
If you’re flashing firmware then the process should not take more than 5 minutes.
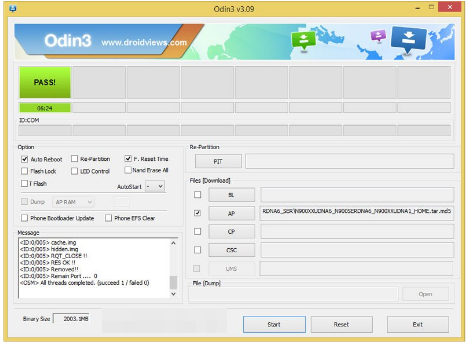
Now you should wait till you read an Odin flash message “PASS!” or “RESET!” which indicates a successful Odin operation.
Your Samsung Galaxy device will restart automatically after the Odin process is finished.
What To Do If The Dreaded FAIL Message Pops Up
You might get a FAIL! Message rather than a PASS! Message.
If that is the case then remove the back cover of your smartphone device and then take out its battery.
Then reinsert the battery
After that, restart Odin. You can also change the Odin version if you like.
Then follow the process mentioned above again. This time, do it with extra care.
If the problem still persists and study the Odin logs in the Message box.
Help Me, I Am Stuck In Bootloop After Installing The New Firmware On My Samsung Galaxy Device
When you install any stock firmware on your Samsung Galaxy smartphone, you might get stuck in a bootloop.
What’s a bootloop? Good question.
A bootloop happens when your Samsung Galaxy smartphone reboots automatically again and again.
If it happens to you, you won’t be able to go past the initial Samsung logo screen.
Apart from a bootloop, if your device is overheating or lagging or is being slowed down or even experiencing huge battery drainage then it is recommended that you perform a factory rest through the stock recovery option.
The End
If you experience any difficulty then don’t hesitate to ask questions using the comments section. Subscribe to the website as well if you want to be notified of the latest guides that will save you money and teach you new skills.

- How to Pair a Vizio TV to Bluetooth Speakers – Quick and Easy - March 28, 2022
- How to Update iPhone Without WiFi - March 17, 2022
- What Is the Need for Businesses to Invest in Hiring for Java Development? - March 14, 2022