If you want to change your Samsung Galaxy J7’s (or any Samsung Galaxy device for that matter) CSC, you need to know three things right off the bat.
Those three things are specifically related to Galaxy series firmware. Namely, there are three components of Galaxy series firmware that you need to know about. These are,
- PDA
- Phone
- CSC
The first thing you should know is that any smartphone’s firmware contains all the information and the details about a specific smartphone.
The PDA, on the other hand, has the information regarding the build version of the firmware. Sometimes industry experts use the term firmware and software interchangeably, so don’t get confused if we do so here too.
And the Phone, does not refer to your smartphone. The Phone, here, means the baseband or the modem version of your smartphone.
Finally, CSC stands for Consumer Software Customization. This piece of information basically refers to the particular geographical location or the carrier of your smartphone.
As the name suggest, the CSC code holds information about software packages which are aimed at specific regions. The CSC code also has information about your carrier branding and the APN (Access Point Name) settings for internet/data connection.
If all this sounds a bit too technical to your ears then know this: you won’t be able to update your Samsung smartphone over Samsung Kies or through OTA (Over The Air) if the codes related to PDA, PHONE and CSC do not match up.
Also, don’t forget that the firmware version and the product code is different for each device. These codes depend on the region or the country where you bought the smartphone from. More specifically, where the smartphone was first sold since you could have bought a new phone which somebody else bought first and then sold it to you without use.
The firmware version of your smartphone, in most cases, can tell you the country or region of a specific device. The firmware version also indicates if a smartphone is compatible with a specific region or not.
As you can see in the image above, the Baseband version of this Samsung Galaxy phone is I9033XXALE8.
The way you analyze this baseband version is that the first five numbers represent your device’s model number. Here the first five numbers are I9300 which stands for Samsung Galaxy S3. The baseband number for Samsung Galaxy J7 should be similar.
Ok, onto the next bit then.
The next two characters on your baseband number represent the country/region/network area code such as Italy, Spain, UK, Germany, Belgium, Austria or Hungary. Right now it’s XX, so that means the phone’s region is among the countries mentioned above.
The next two characters, LE, represent the release date of this specific firmware. Since L is the 12th character of the alphabet series and E is the 5th, the final date comes down to May 12th, which also happens to be the birthdate of Tony Hawk but who cares about that at the moment.
The last character, 8, represents the Revision version of the installed firmware.
As mentioned before, the CSC code of any Samsung Galaxy smartphone’s firmware holds the information about the country or region for which the device is built.
As a user of that smartphone, you can change the region to suit your needs. For that to happen, you need to find a way to spoof Samsung servers into thinking that your smartphone device is from a different region.
That way you’ll be able to get updates from different regions as well.
The unfortunate part of the digital divide is that some firmware updates are only released for specific regions and hence many smartphone users end up with the outdated firmware on their smartphones.
If you somehow get your hands on a firmware update that isn’t meant for your reason and then you apply that update, then you run the risk of getting your Samsung Galaxy device banned from receiving any future updates.
In comes, the CSC. If you can change the CSC number of your Samsung Galaxy smartphone then you can install any firmware from any region of the world. It’s all about changing the CSC code of your particular device.
Now if you’re ready to dive in, then read on.
How To Check A Samsung Galaxy J7’s CSC Number
Now before you can change your Samsung Galaxy devices (including the J7) CSC number, you need to know how to discover it.
And there is a good chance that you won’t know the CSC number of your smartphone device since if you had known your number then you wouldn’t be reading this guide or would you?
Anyway, there are two methods in which you can find your Samsung Galaxy phone’s or tablet’s CSC number.
One way is to check the CSC number of your device by pairing it with another computer via Samsung Kies.
The other method is by dialing a specific code from your Samsung Galaxy’s dialer and check it from there.
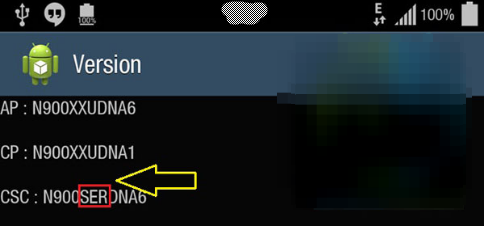
You need to dial *#1234# and when you have done that, you’ll be shown a screen similar to the one shown below.
See the first four characters? Those are the characters you need to ignore. Apart from the rest three characters, the next three characters show the CSC code for you Samsung Galaxy smartphone or tablet.
How Do You Actually Change The CSC Number of Your Samsung Galaxy J7 Device?
Well, for starters, you will need to factory reset your smartphone device. Only then will you be able to change your device’s CSC number.
To do that, just dial the following number with your Samsung Galaxy S IMEI number included : *#272*Your Samsung Galaxy S IMEI number here#
If you don’t know your device’s IMEI number then simply remove the back cover of your Samsung Galaxy J7 (or whichever Galaxy device) and note down the IMEI number which is printed on a white sticker that is present beneath your smartphone’s battery.
When you’ll do that, the smartphone will show you a list of CSC numbers.
All you need to do now is to tap on the CSC number you desire and then tap on Install.
If you’ve done all the steps correctly, your smartphone device will automatically reboot after completing all the processes.
Congratulations. Your Samsung Galaxy device’s CSC number has been altered.
Now onto the more difficult part.
Method 2 To Change Your Samsung Galaxy J7’s CSC Number
It is entirely possible that the method mentioned above did not work for you. Some people have reported that the *#272*Your Samsung Galaxy Device’s IMEI Here# method has not worked for them.
If you are one of those people then you can use an application called CSC Changer. It has been developed by an XDA developers member bassie1995.
This method is guaranteed to work on Samsung Galaxy S4 and a host of other Samsung Galaxy devices.
The only problem is that you’ll need to root your Samsung Galaxy smartphone if you want to change its CSC number.
Don’t worry if you are scared of the word “root access”. You can always undo the root access on your Samsung Galaxy device by making use of an option called Full Unroot.
You can find this option in SuperSU settings. After selecting this option, you’ll need to flash your smartphone using the stock Kernel.
Don’t forget that you will lose all your data and applications on your device’s internal storage and the microSD card if you change your CSC number.
Regardless of the method you use, your Samsung Galaxy device’s data will be removed. So to guard against, that always backup all your data before proceeding to change your CSC number.
Let’s move on to method 2 then, shall we?
First, go ahead and download the CSC Changer application we mentioned before and copy it on your smartphone’s internal storage. You can copy the application to your phone by connecting it to your desktop computer or laptop. You’ll just need a USB cable.
Get the CSC changer application from here.
If for some reason, you can’t get your hands on the CSC changer application then you can accomplish the same thing with CSC Select 5. Get it from there.
After that, you need to download BusyBox application which can get from here. Or if you prefer it to download from Google Play Store then go here.
Now, the order of the next couple of steps is important so pay close attention.
First, you need to install BusyBox and then you need to install CSC Changer on your smartphone. As mentioned before, you must have BusyBox application installed on your smartphone before you install CSC Changer.
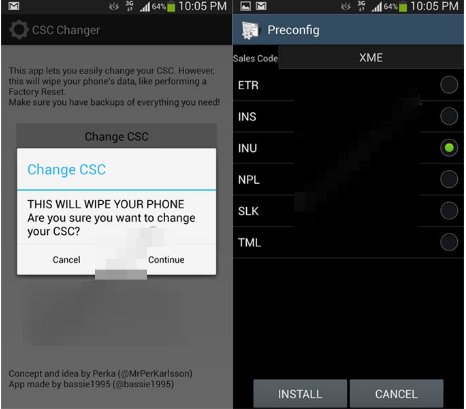
After that, run the CSC Changer application and choose the option “Change CSC”.
When you have done that, the Samsung Galaxy device will automatically take you to a screen which will show you a list of CSC numbers.
The list of CSC numbers will only be shown if your Samsung Galaxy J7 (or any other Samsung Galaxy device) has a firmware that is multi-CSC enabled.
From the list of CSC numbers, choose the one you want and then simply tap on the Install button.
After the process is completed your device will automatically reboot. After your Galaxy J7 reboots, you’ll have the new CSC number for your device.
Congratulations.
Onto the next step then.
Method 3
You can never be too careful when it comes to customizing your smartphone devices. It turns out, that method 2 also hasn’t worked for a tiny number of users.
Well, we are here to list another method that works with any Samsung Galaxy device. This method is particularly suited to those Samsung Galaxy users who have already updated their smartphone to Jelly Bean version of the Android firmware.
First things first, turn off your Samsung Galaxy J7(or any other Galaxy smartphone) completely.
Then boot your Galaxy device into Recovery mode by pressing and holding the volume Up (+) button plus the Home button plus the Power button simultaneously.
Just to be sure, that’s three buttons you got to press and hold at the same time for several seconds.
Now release the keys. If you have followed the previous step correctly, your smartphone will boot into Recovery mode. An indication would be a lot of blue text on the screen.
Now you must scroll down to the option labeled “Wipe data/factory reset” using the Volume key.
Select the “wipe data/factory reset” option with the Power key
Also, remove all cache data from your smartphone
After that, select the “reboot system now” option
When your smartphone restarts, try the CSC change number method again.
Method 4
We’re going to be super safe here and list out all the methods that could possibly help you change your CSC number so that you can root your Samsung Galaxy smartphone.
So onto method 4 then.
First, download the free application known as Samsung Galaxy S/S2/S3 CSC from Google Play Store.
Then, install it on your smartphone device.
After that run the application by tapping on its icon.
Then follow the instructions on the screen carefully and take advantage of the hints given.
That’s it. You’re done.
Important: This method is only applicable to those Samsung Galaxy smartphones which have been rooted. For a complete root guide, check this out.
Method 5
We’re on the homestretch here so don’t give up if the four methods mentioned above did not work for you.
For this method, you must have root access to your Samsung Galaxy J7(or any other Galaxy smartphone) smartphone. Along with that, you’ll also need to have stock ROM on it.
Also, this method will definitely wipe your smartphone’s data.
First, download CSC changer application on your Samsung Galaxy J7(or any other Galaxy smartphone).
Then, install CSC changer on your smartphone.
After that, run the application on your smartphone in order to find the CSC number of your Galaxy device.
Now, if the screen is showing you a CSC list then select the one that you want and then simply hit the Install button.
If the CSC changer software does not work for you then install the alternative ES file Manager application on your smartphone.
In fact, any root browser application would do as long as you trust the source of the software.
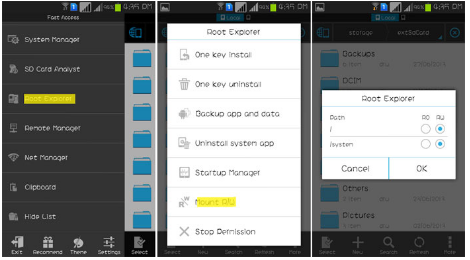
When you have installed the application, just launch the application and select the Root Explorer option.
Then simply change the R/O value to R/W.
Then from the resulting menu, go to /efs/imei/ folder and edit the respective CSC number in the mps_code.dat file.
Save any changes that you make.
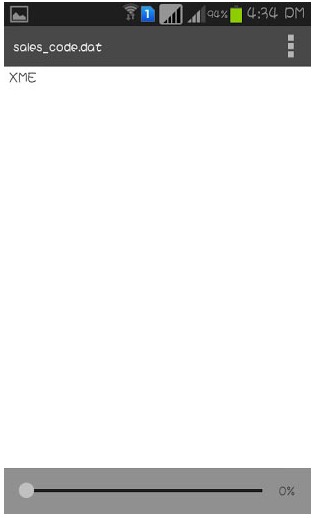
After that’s done, then go to /system/csc/ folder. Here you need to edit the CSC number in sales_code.dat file
You’re almost done, so keep going.
Now save any changes that you have made and reboot your Samsung Galaxy J7 (or any other Galaxy device) device.
Now comes the slightly tricky part.
Install an app named Triangle away and then use it to custom flash counter.
After that’s done, download the stock firmware and install the firmware for your smartphone through Odin.
Now you should have a flashed firmware smartphone.
Reboot into stock recovery mode and check if your smartphone has the new CSC number.
If none of the methods worked for you then maybe you should give up and live with your standard Samsung Galaxy J7 (or any other Galaxy device) device.
List of CSC Codes for Samsung Galaxy Device’s Firmware,
A
Afghanistan = AFG
Algeria= TMC, ALG, ALR
Argentina= ANC, ARO, CTI (Claro), UFN (Movistar), PSN (Personal)
Aruba= ARU
Australia= XSA, OPP, OPS (Optus), VAU (Vodafone), TEL (Telus), HUT (Three/Vodafone)
Austria= AOM, DRE (3 Hutchinson), MAX (T-Mobile), MOB (A1), MOK, ONE (Orange), TRG (Telering), ATO
B
Bahrain = ARB
Baltic= SEB
Belarus= MTB, VEL
Belgium= BSE, BAE, PRO, XEB
Bangladesh= TML, ETR
Bosnia-Herzegovina= ERO, BHO, BHT (BH Telecom), TEB
Brazil= ZTO, BTA, BTM, TMR, ZTA (Claro), ZVV (Vivo), ZTM (TIM)
Bulgaria= CMF, GBL, MTE, MTL (MTL), OMX, PLX, VVT (VVT)
C
Cambodia= RCG
Canada= BMC (Bell), RWC (Rogers), TLS (Telus), KDO (Koodo)
Chile= CHO, CHB, CHE (Entel PCS), CHL (Claro), CHT (Telefonica)
China= CHN, CMC, CUH, INT, M00, TEC, TIY
Colombia= CGU, COB, COL, COM
Costa Rica= ICE
Croatia= CRO, TRA, TWO, VIP
Cyprus= CYV
Czech= ETL, KBN, O2C, OSK, TMZ, VDC, XCS, XEZ
D
Denmark= DTL
Dominican Rep.= CDR, TDR
Dominica= CST, DCN, DOR
E
Ecuador= BBR
Egypt= EGY
El Salvador= DGC, TBS
F
Finland= ELS, SAU
France= XEF, AUC, BOG, COR, DIX, FTM, NRJ, OFR, ORC, ORF, OXA*, SFR, UNI, VGF
G
Germany= DBT, DTM (T-Mobile), DUT, EPL (E-Plus), MAN, MBC, OXA*, VD2 (Vodafone), VIA (O2), XEG
Ghana= SPN
Greece= EUR, AOC, COS (Cosmote), CYO, GER, OXX*, TGR, VGR (Vodafone), ILO (HotMobile)
Guatemala= PCS
H
Hong Kong= TGY
Hungary= XEH, PAN (Telenor), VDH, WST, TMO, TMH (T-Mobile)
I
India= INU, IND, INA, INS, IMS, REL
Indonesia= AXI, SAR, XSE
Iran= THR
Ireland= 3IE, VDI
Israel= CEL, PCL, PTR
Italy= FWB, GOM, HUI, ITV, OMN, OXA*, TIM, VOM, WIN, XET
Ivory Coast= IRS, SIE
J
Jamaica= JBS, JCN, JCW
Japan= DCM, SBM, VFK
Jordan= LEV
K
Kazakhstan= EST, KCL, KMB, KZK, OXE*, SKZ
Kenya= KEN, KEL
Korea= SKT
L
Libyan Arab Rep.= MMC
Lithuania= TLT
Luxembourg = LUX
M
Macao= VTN
Macedonia= TMC, MBM
Malaysia= CCM, FME, FMG, MXS, OLB*, XME
Mexico= SEM, TCE, TMM, UNE
Mongolia= MPC
Morocco= FWD, MAT, MED, MWD, SNI, WAN
N
Netherlands= BEN, KPN, MMO, ONL, QIC, TFT, TNL, VDF, VDP, XEN
New Zealand= VNZ
Nigeria= ECT, GCR, MML
Norway= TEN
P
Pakistan= PAK, WDC
Panama= BPC, PCW, PBS
Peru= PEB, PET, SAM
Philippines= FAM, GLB, OLB*, SMA, XTC, XTE
Poland= ERA, IDE, PLS, PRT, XEO, OXA*, OXX*
Portugal= OPT, OXX*, TCL, TMN, TPH, XEP
Puerto Rico= CEN, PCI, TPR
R
Romania= CNX, COA, HAT, ORO, OXX*
Russia= AZC, BLN, EMT, ERS, GEO, MTV, OXE*, SER, SNT
S
Saudi Arabia= JED
Serbia Montenegro= MSR, OXX*, PMN, SMO, TOP, TSR
Singapore= MM1, XSP, SIN (Singtel), STH (Starhub), BGD, XSO
Slovenia= MOT, SIM
Slovakia= GTL, IRD, ORS, OXX*, TMS
South Africa= XFA, XFE, OXX*, XFC, XFM, XFV (Vodafone)
South West Asia= SWA
Spain= FOP, AMN (Orange), ATL, EUS, XEC (Movistar), YOG (Yoigo)
Sweden= BAU, BCN, BME, BSG, BTH, COV, HTS, SEN, TET, TLA, TNO, VDS, XEE
Switzerland= AUT, MOZ, ORG, OXX*, SUN, SWC
T
Taiwan= BRI, CWT, TCC, TCI, TWM
Temporary= TEM
Thailand= CAT, OLB*, THE, THL, THO, THS
Tanzania= SOL
Tunesia= ABS, RNG
Turkey= TUR, BAS, KVK, TLP, TRC
U
Ukraine= KVR, SEK, UMC
United Arab Emirat= AFR, ARB, ITO, MID, OXE*, XSG
United Kingdom= BTU, EVR (EE), BTC, CPW (Carphone Warehouse), H3G, O2I, O2U (O2), ORA (Orange), OXA*, TMU (T-Mobile), TSC, VIR, VOD (Vodafone), XEU
USA= AWS, CLW, DOB, TMB, USC
Uzbekistan= UZB
V
Venezuela= VMT (Movistar), DGT, MVL
Vietnam= DNA, FPT, OLB*, PHU, SPT, TLC, VTC, VTL, XEV, XXV
- How to Pair a Vizio TV to Bluetooth Speakers – Quick and Easy - March 28, 2022
- How to Update iPhone Without WiFi - March 17, 2022
- What Is the Need for Businesses to Invest in Hiring for Java Development? - March 14, 2022


