
Install Kodi and rule the online content world.
If you asked anyone to sum up Kodi in one sentence, the answer would probably go something like this: with Kodi, you can stream all content, all the time and for free.
In simple words, Kodi is a magnificent piece of software that can play content from a host of sources for free on any supported device.
We won’t fault you for not being familiar with the term Kodi. Kodi was previously known as Xbox Media Center, in short XBMC, but then got rebranded as Kodi.
And since it is such a convenience to use this free and open-source media player software application (developed by the XBMC Foundation), we are sure of the fact that by the time you have read the whole of this guide, you’ll be able to stream your favorite content, for free, right from your device of choice.
It doesn’t matter if you’re new to this process. In this guide, we’ll show you how to download and install Kodi on your device in the simplest of steps.
You should also know that Kodi isn’t just a fantastic media player. It also allows users to stream content from any place on earth such as live sports, movies, podcasts and everything else, all neatly streamed at one place and that too for free.
We really doubt if other online streaming services such as Netflix can’t even begin to compete with Kodi. Kodi has a much wider variety of content and most of all, it’s all free. Kodi is your perfect companion for the cold nights and weekends in the coming months.
Kodi is a free and open-source media player that can stream content on multiple devices and platforms. The people who developed Kodi behind the scenes wanted to make Kodi an all-inclusive media player that had great usability. And since, Kodi is free for anyone willing to download a piece of software on his/her computer or mobile device, it gives a great opportunity to consumers along with third-party app developers to get involved with Kodi and improve this open source project.
To get a clearer idea of what Kodi is and how useful it can be for all your streaming needs, check out the video below.
What Exactly Is Kodi?
Kodi is an open source media player that was previously known as Xbox Media Center, or XBMC. Formally, Kodi is a software application that was originally developed by a homebrew team. That team wanted a media player to stream any content on the hugely popular gaming console, Xbox.
The XBMC on Xbox was able to present a media directory (in other words a media index) to the users who had Xbox hooked up to a big screen such that of a TV or HDTV.
Of course, a software as robust and adaptable as Kodi was bound to move beyond the constraints of Microsoft’s extremely limited gaming console, the Xbox.
Fast forward to 2016 and Kodi has become a software that can be downloaded and installed on almost any device that can be bought from Amazon or any electronic shop. You can use Kodi with PC, Apple TV, Raspberry Pi, Samsung Galaxy and even Android. Of course, not many people would want to stream content on a Raspberry Pi, but that really shows you the dedication of the developer team behind Kodi.
They really want to make Kodi universally available and useful.
Kodi can also be linked up with dedicated set-top media boxes. In fact, some set-top media boxes come pre installed with Kodi.
As is always the case, devices from Apple such as Apple TV need to be jailbroken in order to join the Kodi party but is that really a surprise from Apple? When has Apple ever made efforts for an open source software, let alone an open source and free media player?
As indicated before, Kodi on its own if an open source media player. It is free and supports a wide range of operating systems.
In other words, you can use Kodi to stream your favorite content with almost any type of software. Kodi has been specifically developed to connect with devices such as your TV or even a projector so that you are able to browse as well as stream different forms of media content.
Think of Kodi as an app for your TV which manages all the media you could ever want to consume.
How To Install Kodi On Your Mac
Since Kodi is a tool, of sorts, you’ll need to first install it in the correct manner which is dependent on your device.
Moreover, if you want to access content from any region in the world you’ll need to initiate a link to a server that contains the relevant Kodi add-ons along with the content you want to view.
To accomplish this task we’ll need a Fusion installer. The duration of the process, as always, is dependent on your computer or device, the operating system, the hardware specs but it should not take you more than 18 minutes to set up the whole thing.
After you have established a connection with the desired server then you can proceed to add some Kodi add-on libraries. These libraries are, of course, free and readily available.
When you have identified the add-ons server, you must install a particular add-on for the type of content you want to view. You can achieve that via two methods. Let’s take a look at them.
- The easiest (and recommended) way is to let Config Wizard (we’ll come to this term in just a while) auto-configure Kodi addons. The benefit of following this method is that this will enable the most optimized and readily available Kodi add-ons. In fact, this method will also personalize some of the most vital settings without a single input from you.
- The other method is the manual one. Basically, you’ll have to install Add-on Installer and then configure it on your own. We’ll of course guide you the whole way and in fairness, installing the Add-on Installer isn’t difficult. It is pretty intuitive to use as well but does require a bit of knowledge about installing applications and understanding different settings.
Before we move on to the actual process, there are a couple of things you should keep in mind.
These are:
- Always download the latest stable Kodi version
- Always download Kodi from the official Kodi website
- Currently, the latest version is Kodi v16.1 Jarvis. So go get that from the official website here.

Most of you who have tried to install Microsoft Office on Windows would know that the process is a bit more than just straightforward. Fortunately for us, installing Kodi on Mac is simple and direct.
It should not take you more than five minutes to install Kodi on your Mac.
Step 1:
Download the latest version of Kodi software application from the official website. Ensure that you select the package that is meant for your operating system i.e OS X or x86.
After the download is complete, you should extract the Disc Image and then double-click on the new file.

Step 2:
After extracting the disc image on your desktop, you need to open the extracted disc image. After that all you need to do is to drag and drop the Kodi icon to your Applications folder.
Step 3:

After that, go to your disc image, which is located on your desktop, and right click on it. Then choose the option Eject XBMC.

Step 4:
Now run the Kodi application by selecting it from the Applications menu.
If for some reason your machine doesn’t launch Kodi application then it is an indication that the Kodi application was built by some unheard of developers.
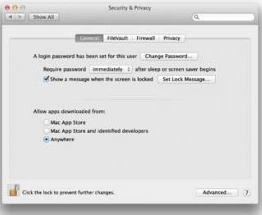
To solve this problem, first, click on the Apple icon and then select System Preferences. When that’s done, select Security And Privacy.
After that, unlock the lock icon that is located in the bottom left corner of the Security & Privacy window.
Then have a look at the Allow apps downloaded from section and click Anywhere.
The process is almost finished so hang on.
Now all that is left is for you to access the relevant Kodi add-ons. For that you need to install Fusion Installer and then either Config Wizard (if you want to automate the process somewhat) or Add-on Installer (if you want to go for the manual approach)
How To Install Kodi On Your PC
As should be expected, Kodi installation on PC (a PC running Windows that is) is simpler when compared to Mac.
You can be done with the whole process in less than ten minutes.
Step 1:
As before, download the latest stable version of Kodi. Make sure that the Kodi you install is for the Windows operating system.
 Step 2:
Then, click on the downloaded file to initiate the installation process. It should not take more than a couple of minutes. When the installation is complete, simply click Finish to complete the installation.

For more streaming options, you can also download and install CucoTV on your PC or Mac.
How To Install Fusion Installer
Now comes the part where you need to connect your Kodi software to the add-on server. When that’s done, you must choose and then initiate the add-ons for your desired content.
Let’s configure Fusion Installer then.
Step 1:
Go to File manager and then click Add source.
Step 2:
Look for a box that is labeled <None> and then input the address https://fusion.tvaddons.org into the box. Then click Done.

Step 3:
In the lower input field, enter fusion. Then click Done and then OK.
Step 4:
Now go back to the main menu. Then to Settings and then select the Add-ons tab.
Step 5:
You should be able to see a dialogue box that goes something like “First run help….”. Click OK to get rid of the notification and then move on to the next step.

Step 6:
Choose Install from zip file and select fusion from the resulting list. Now you can install Kodi add-ons from any folder on your computer.

Step 7:
Now click on the start-here folder and then click on the file named video.hubwizard-1.1.5.zip.
Step 8:
Head back to the main menu and then choose Programs. Now you should be able to launch the Config Wizard and enable all available Kodi add-ons.

How To Install Config Wizard
The Config Wizard will help you to browse each and every Kodi add-on that is available in any repository regardless of your operating system. Of course, you will have to go through a couple of more steps to actually set it up.
Step 1:
If you have followed this guide down to a tee, then you should have opened up the Config Wizard in the previous step.
So now, just select the relevant platform, Windows or Mac depending on your machine by clicking on the cards shown.

Step 2:
The previous should have opened up a small popup window. Click Yes in order to proceed. Remember, you will have to wait for about seven to ten minutes to allow the Config Wizard to finalize the procedure. It will configure all the Kodi settings automatically and will enable you to access all available Kodi-addons.
Step 3:
Now the installation wizard should take you back to the main menu. Restart the Kodi application to proceed to the next step
Step 4:
If you’re prompted with an update request (from the Kodi app of course) then allow it to do that since it won’t take longer than five or six minutes (depending on your hardware specs of course).
Got it?
Great. Now you have, at your disposal, all the content that you could ever want and it has become possible because of Kodi and Kodi add-ons.
How long did it take you? We’re sure that it would not have taken you more than twenty minutes.
How To Install Add-on Installer
As indicated before, this method for those users who want to set up everything on their own without any help from the computer. In other words, manually.
This method also allows access to all Kodi add-ons. It will just take a bit longer to set up properly. We’ll proceed by launching the Add-on Installer. In the previous method, you accomplished the same task with the help of Config Wizard.
The only difference between the two process is that Config Wizard also installs most of the greatest Kodi add-ons automatically while the Add-on Installer doesn’t do that instantly and instead asks the user to select the desired Kodi add-ons.
But don’t worry, the procedure itself isn’t complicated at all, it is just a bit longer.
Step 1:
As before, you should launch Fusion Installer before beginning this process.
Step 2:
Then go to the main menu, then to System option and then hit Settings.

Step 3:
When that’s done, click the Add-ons tab from the resulting (new) window.
Step 4:
You probably figured it by yourself but there is no escaping the fact that you’ll need to install from zip file once again. Then click fusion and from the resultant windows, start-here.
Step 5:
Now is the time to open the file labeled program.addoninstaller-1.1.7.zip

Step 6:
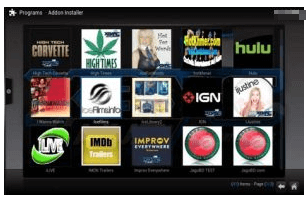
From Kodi’s main menu, head towards Programs and then launch Add-on Installer.

Step 7:
Keep in mind that the first time you launch Add-on Installer, you will have to let the application run for a couple of minutes before it configures Kodi settings.
Step 8:
Now is the time to choose any add-on category that you desire. It can be anything related to video, audio, programs and other bonus feature Kodi add-ons.

Step 9:
When you choose a specific category, it will open that particular category which will allow you to browse the contents of the category. If you find something interesting to install then simply click on that particular item and then select install.
Step 10:
You’ll have to wait for another minute or two before Kodi completes the installation process for the chosen add-on.
Step 11:
After the previous step has approached its finishing point, you should be able to start the installed Kodi add-on. To do that, simply go to the main menu and then to Videos. After that just select Add-ons.

Step 12:
When you select Add-ons, the program will show you the list of all installed Kodi add-ons. You should choose the one you wish to move forward with.
Step 13:
This is a completely optional step. If you want to allow hidden settings then go ahead and select Installer Settings.
As mentioned before, working with the Add-on Installer is slightly more difficult than the Config Wizard method. Moreover, you’ll have to go over this tedious process every time you add a new Kodi add-on.
On the other hand, Config Wizard automatically does all this work for you by installing all popular Kodi add-ons during its installation.
Of course, the Add-on Installer process doesn’t require an extraordinary amount of effort. It just takes more time.
Congratulations. You should be able to watch and enjoy Kodi from your PC or Mac without any problems.
Again, we want to make one point clear to you. Some of the unofficial Kodi add-ons stream copyrighted material. That can get you in a lot of trouble in some countries. You may even get fined thousands of dollars for downloading/streaming pirated content.
There are many law firms in Europe and USA who specialize in going after people who stream illegal content online. After finding these individuals, these law firms then prosecute them.
If you don’t want that to happen to you then make sure you’re using a VPN service.
As pointed out earlier, A VPN is just a application that you must turn on before running Kodi and it will automatically hide and encrypt all your online activity and hence spying agencies won’t be able to get to you. Your internet service provider or government also wouldn’t have a clue about your online activities.
We’ve done a lot of research on this subject and have found out that IPVanish is the quickest VPN service for streaming content on Kodi. There is hardly any buffering while streaming when you use IPVanish with Kodi.
Cheers.
How To Connect Kodi With Your TV
If you want to connect Kodi with your TV then you must do so via two unique methods. First method is for you to cast content from your desired device directly over Wifi or even with a cable (HDMI or VGA) connecting your TV and your chosen device.
Of course, you’ll have to insert some sort of a dongle into your TV unless you have a really modern (and expensive) one.
When you have connected your Kodi device with your TV then you can actually view Kodi interface directly on your TV screen and navigate all its menus via a remote control.
Don’t forget the fact that you can use Kodi as a stand-alone application package on your smartphone, tablet or even your desktop computer.
Kodi is immensely versatile in its compatibility.
What Can You Do With Kodi Apart From Media Files?
We already hinted at the many features of Kodi in terms of playing content from different sources but we’ll describe those features with a bit more detail here.
You already know that Kodi can play any and every type of media file on your device. You can play media files on Kodi both from your local storage and network storage with a problem.
But Kodi goes beyond that. With Kodi you can also stream media content from a variety of other sources such as the internet.
With Kodi and an internet connection you can view videos, audio files, podcasts along with movies from all corners of the globe.
If a media content is available in a common format then Kodi can play it. You will never have to worry about running the correct version of any media file, ever again because Kodi does all that for you in the background.
How Is Kodi Better Than Anything Else on The Market?
Kodi sets itself apart from the rest of the competition (if there is indeed one) not just because of its robust platform but with what it brings to the table as far as variety of content and compatibility is concerned.
Add to that the fact that Kodi can take advantage of hundreds of developers who spend all their free time developing add-ons for Kodi which allows it to access even more content on the internet. And since everything is open source, everyone can build upon the work of everyone else and hence that gives birth to an excellent Kodi ecosystem.
Just like a smartphone uses apps to enhance user experience, Kodi uses a virtually unlimited number of Kodi add-ons to play more content than ever before. Kod add-ons are developed by third-party developers and content providers so that users can access their online services.
And you need to believe us when we say that there are more Kodi add-ons available online then you or anyone can care to count.
Kodi also has an official repository which hosts a sanctioned list of Kodi add-ons. These add-ons include different types of add-ons such as video add-ons, skin add-ons, screensavers, lyrics, programs, games and even some weather apps.
Kodi is all encompassing as far as media consumption is concerned.
Moreover, you can search for video applications for Kodi that can enable you to watch content such as the Hallmark Channel, Cooking Channel, LiveLeak, TED Talks, and the much-sought-after NBA League Pass.
With that said, it is probably true that most of the premium and popular Kodi add-ons are not available via Kodi’s official repository. The reason for that is simple: laws.
Because of some convoluted and complex laws that are implemented differently in different regions of the world, there are a lot of murky areas and that leads us to our next section.
Kodi Add-ons Apart From The Official Kodi Ones
Before you presume anything negative about unofficial Kodi add-ons, we want to assure you that you can always access all of the Kodi officially-approved application from the Kodi official repository.
If you want to really take your Kodi experience to another level such as viewing Netflix through Kodi on your HDTV or even stream some not-so-legal online content, then unofficial Kodi applications can help you do that.
Of course streaming pirated content is always a risk because, legally speaking, each country has its own interpretation of what constitutes copyright violation and what doesn’t.
Therefore, before streaming content from unofficial Kodi add-ons on your device through Kodi, you should always check if the law in your region allows for that.
And just for clarity’s sake, unofficial Kodi add-ons have not been authorized by the official Kodi team.
What does that mean for the end user?
It means that while you’ll be able to access a much wider variety of content from Kodi on your desired device, there is also the risk of malicious programs being injected into your device. You could also allows viruses to enter your system through unofficial Kodi add-ons.
To counter this problem, you need to be more careful about which unofficial Kodi add-on you download and then install. If you’re not picky about this process then you’re likely to end up with some big problems.
As indicated earlier, even though unofficial Kodi add-ons are not approved by the official Kodi team and might contain viruses, there is no doubt about the fact that unofficial Kodi add-ons take your Kodi experience to another level that is simply unattainable by those who use Netflix to stream content from the internet.
At the time of writing this post, the most accredited unofficial Kodi add-on is Exodus.
Exodus is a marvel in its own right. This unofficial Kodi add-on allows users to stream movies and TV shows for free from a wide variety of online sources and also has IMDB integration. It can keep a record of what your “watched” history and has a pretty smooth user interface.
Then there is Castaway, which can stream sports from several different websites to provide users with the ultimate sporting experience.
Using Castaway, users can view sports content such as match replays and live matches on the go. You can also view other esoteric stuff like KissAnime which streams HD anime TV series and movies directly to your TV (with the help of Kodi of course).
In short, using unofficial Kodi add-ons you can watch any content you want, any time you want and anywhere you want. It’s just that simple.
Why You Need To Use A VPN Service With Kodi?
As indicated earlier, using Kodi with non-official add-ons puts you in a precarious situation so if you want to avoid that or just want to prevent anyone from monitoring your online activities then you need to use a VPN service. Of course, we’re assuming that you aren’t using a VPN service already. It really is that important.
A Virtual Private Network (VPN) basically masks the network traffic from and to your chosen device. As a result, actors such as government agencies and marketing companies can only monitor the traffic that goes into and out of the VPN service’s node.
Moreover, the data from the VPN node is further obfuscated by combining it with data from other users who also happen to use a VPN service.
In the end, no one can snoop on your online activities and hence your connection to the online world is secure and anonymous.
You don’t need us telling you that government agencies along with other spying agents have stepped up their game and are wiretapping more online activity than ever. So you need to protect your private information more than ever before.
There are a lot of VPN services out there and sometimes it can become difficult to determine which one is the best.
We recommend IPVanish but you can make up your mind by reading this list of top VPN services.
Again, we’ll remind you that Kodi is an absolutely brilliant piece of software. If you still have not downloaded Kodi already then go do so right now.
In an ideal case, you should download one copy for your laptop and another one for your smartphone. If you do that, you’ll never have to worry about a streaming player again because Kodi will take care of all your streaming needs forever.
Of course, as mentioned before, if you’re going to utilize Kodi to its maximum potential then you need to make sure that you’re using a VPN service along with sturdy hardware and software to maximize your online protection.
How To Install A VPN For Kodi
If you want to install a VPN service for your Kodi (OpenElec in this case but the steps are generally the same) then you need to follow the given below steps very carefully.
- First, open up the Kodi application
- Then go to System and then to File Manager
- When you’ve done that then click on Add Source
- After that select None
- Now you need to type the exact phrase “https://fusion.tvaddons.ag”
- Then select Done
- After that, move over and highlight the box that lies below Enter a name for this media Source
- Use your device to type Fusion in there.
- Hit OK
- Now, head back to the main Home Screen
- Click on the System option
- Go to Add-ons
- Then to Install from zip file
- After that, select fusion
- When that’s done, then hit the xbmc-repos option
- Then, hit English
- Select repository.metalkettle-x.x.x.zip
- Now you may need to wait for a bit more the next prompt shows up. In other words, wait till you get an Add-on enabled notification
- Then, head over to Install from repository. In some other version, you may need to select Get Add-ons (such as on Helix).
- When that’s done, then go to MetalKettles Addon Repository
- Then go to Program add-ons
- Then, to openvpn
- After that, select Install
- Again, you’ll need to wait till an Add-on enabled notification shows up
- Choose VPN for OpenELEC
- Choose Install
- For the third time, wait for another Add-on enabled notification
- Now, all the required add-ons should be installed on your device. The only then left to do is to configure the VPN for OpenELEC add-on.
- For that, first choose VPN for OpenELEC
- Then hit Launch
- After that, Setup VPN
- Then, select your specific VPN Service Provider. That should be IPVanish if you took our advice.
- After that, go to Continue and then input the necessary account details
- Input your VPN Username
- Then input your VPN Password
- After that, select OK to finish off the setup
- Now you need to go back by selecting the 2 dots
- When you’ve done that, then select Configure VPN
- Now you should be able to view all the servers that are available for your account. You can go ahead and choose the one you want to connect to.
- When you’ve done that, the Kodi add-on with automatically connect to the chosen server. More precisely, it will TRY to connect.
- You will get a new notification when the VPN service has been activated on your Kodi add-on.
As always, you can go back just one screen and view your IP address by selecting Check My IP. When you do that, you should be able to see a popup that will show you your new IP address along with your new location.
There are a lot of reason to use IPVanish as your VPN service of choice. Some of those are:
- With IPVanish you can access almost all Kodi add-ons
- Users can access region-locked content from any place in the world
- Gain anonymity and encryption for all your Kodi activities
- IPVanish does not keep any log files on its users
- IPVanish has a Kill Switch that shuts down the network if VPN connection is lost
- IPVanish offers a seven day money back guarantee so there is no risk involved in signing up for the service.
- IPVanish stops your internet service provider from throttling your connection
Get IPVanish here.
Conclusion
Nice work. If you followed this guide properly, you should have Kodi on your device and all the content in the world that you could ever wish to see. Go on and discover more each day with new Kodi add-ons.
As always, if you get stuck during any part of the process then use the comments section below to ask your question or problem.
Don’t forget to subscribe to securitygladiators.com also.

- How to Pair a Vizio TV to Bluetooth Speakers – Quick and Easy - March 28, 2022
- How to Update iPhone Without WiFi - March 17, 2022
- What Is the Need for Businesses to Invest in Hiring for Java Development? - March 14, 2022