 Apple’s iTunes service is the only place where you can find all the “latest and greatest” TV shows, books, applications and a lot more.
That isn’t entirely true. What is one hundred percent true is that the largest collection of all forms of media is only present in the US version of iTunes.
The reasons for content blockage are many. The chief ones among those are copyright issues and audience preferences.
That doesn’t mean you can’t sign up for an iTunes Account. Anyone can do that from the comfort of their computer screen. The hard part is to have access to the best content out there.
For that you are going to need a US iTunes account.
And that’s not just for iTunes. Even for services like Netflix, Hulu, Amazon, Pandora and other streaming websites, to access the best content i.e. the content available to the US, you need to have an iTunes account that is US based.
This wasn’t the case from the beginning. In the early days, anyone could open up an iTunes account that was US based even if the person signing up wasn’t in the US. Now, unfortunately, that isn’t a viable option.
So in order to avail all the great US content on Apple iTunes, you need to change your IP address to an IP address that is based in US. That would enable you to access US content on iTunes, without being on US soil.
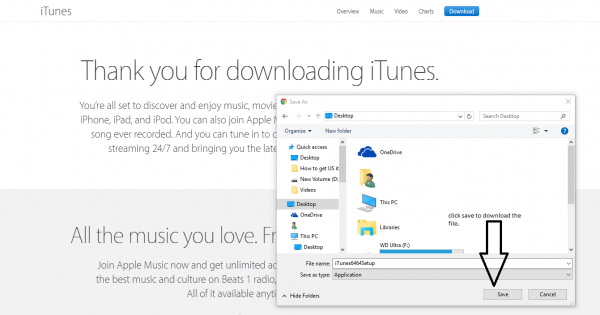
Step 1: Download iTunes from Apple Website

If you have already done that bit, then you need to make sure that you are logged out completely. Sign out and then proceed to the next step.
I should perhaps mention here that you must try to not reveal your original IP address to the iTunes machine because then you wouldn’t be able to access US version of iTunes.
However, if you are new to iTunes and want to have access to the US version of iTunes then head on over to Apple’s official website and download iTunes from there.
After you have downloaded the application, run it and then say yes to everything until the application in installed on your computer machine (windows/Mac etc.).
This step is probably the simplest of the five steps. You should have no problems whatsoever moving forward from this step.
However, if you would like to see an image (to get the whole picture since some people are better visual learners) then head towards the end of the article and check out the image named “Step 1”.
That should be able to guide you if you have downloaded the right file.
The process of installation isn’t too complex either. As mentioned before, you will simply need to hit whatever button that comes up on the screen and moves the process forward.
Apple has made the process of installing iTunes so simple that you cannot possibly mess this up.
All you have to do is search, in Google preferably, Apple iTunes on the internet and then go to the official website of Apple. From there download the installation file, the website will pick out the appropriate version of the software for your computer automatically, and then execute that file.
Done? Fantastic. Let’s move on to the second step of the five-step process.
Step 2: Select a VPN Before Proceeding Further
Perhaps the most important step of all.
You need to have an IP address that is in the United States America and not anywhere else. For that, you need a VPN service.
With a VPN service you’ll be able to enjoy all the games, productivity applications and movies that are available in the US version of iTunes.
Now, granted, there are quite a few free ones out there but only a handful of them actually provide you with a safe and reliable, US IP address.
A good VPN service will provide you with an IP address that is located inside the territory of United States of America.
A decent VPN should also provide fast servers, total data encryption, and zero log storage.
By now, you should be able to understand why you need a VPN service that has remote servers in the United States of America.
But we want to make sure you really know your stuff so we’ll repeat it. You need a VPN service to change your current IP address to an IP address that is in the United States of America so you can use the US version of iTunes and enjoy the best content available on the internet.
The VPN service that we recommend is IPVanish as it has been mentioned on sites like Business insider, Lifehacker, Cnet, The New Yorker and PC advisor which are industry giants.
You need to subscribe to a VPN service before you can move on to the next step. Don’t even think about signing up for an account on iTunes without installing VPN software because otherwise, you will not be able to access US version of iTunes.
You will also need to use the VPN software to download free and paid apps after you have signed up with iTunes.
After you have signed up for a reputed VPN service, you need to choose an IP address that is in the US.
You can easily do that by going to the settings menu and selecting the servers that are from the US.
Don’t proceed further until you have successfully performed this step. Just go to the VPN application’s settings menu and change your IP address to a US based one.
An alternate method involves you subscribing to a DNS service that would provide you with a DNS address that is in the United States. The only difference between a DNS and a VPN is that a VPN provides you with anonymity and data encryption.
A DNS does not give you that but does offer you more competitive packages.
Check out Overplay DNS service. This is the one we recommend to most people. There are no special instructions to follow in order to get a DNS service up and running on your computer.
Similar to the VPN’s case, all you need to do is download DNS service application to your computer and then install it. After that, go to the settings menu and change your DNS to a US based one.
That’s it.
Don’t hurry to the next step unless you have sorted this out. Get a US IP address before moving on from this stage.
Step 3: Be Extra Careful When Changing the Country to the US

By now, you should have iTunes installed on your computer.
Now you should open up the application if it isn’t already opened by default.
Then you must scroll down the homepage towards the end.
On the bottom right corner, you would see a circular flag. That flag should indicate a US flag. Not any other.
If your VPN service is working correctly, then the flag circle would automatically show a US one.
Otherwise, you can just click on the flag and change it to the US from your home country.
Check out step 3 image to have more clarity.
Step 4: Create Your iTunes Account. Not the Usual Way.

This step is also a very important one. You’re on the home run now so don’t bail out. Let’s take this to the end.
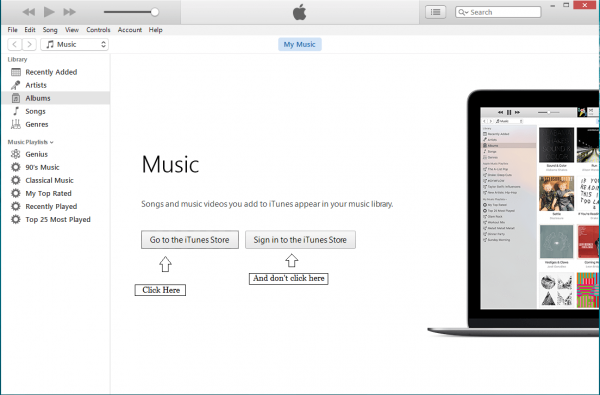
The application will ask you to “create an account”. Don’t do that.
Instead, click on “Go to iTunes store” and browse some free apps there.
When you like some app, click the “Get” button. The “Get” button is usually located somewhere on the left-most pane of the application window.
When you have clicked the ‘Get’ button, the application will take you to a login page.
It is there that you need to make an account. A new one.
Just fill out the details as accurately as you can but stop at the point when the form asks you for your address.
You need to input a US address.
A quick Google search will get you that address. Seriously it will. Just Google US address and you will a lot of search engine results showing you exactly what you need.
Don’t try to input garbage in the address field. iTunes is a very smart application and it will recognize that junk and won’t allow you to proceed further.
The address that you will input has to be a US one. It doesn’t have to be real but it has to be something legitimate.
Step 5: Configure Payment Options. You May Not Need Your Credit Card

The last step will ask you to configure payment options.
You must select “None” and move on from that page.
After that you are expected to receive a confirmation email to confirm your new account and all you have to do then it to head to your email account and click on the sent link to verify your account with iTunes.
Don’t worry about not inputting credit card details. You don’t need a credit card to buy stuff from iTunes.
You can easily buy US iTunes gift cards from various authentic websites online like eBay etc. Do ensure that the seller you buy the iTunes gift cards from is a reputed one and is selling the ones that will work in US iTunes store.
Remember, you will not be able to pay for application in iTunes with your normal credit card. If your credit card isn’t a US based one, then it won’t work in the US version of iTunes.
The gift card, which you can easily obtain from eBay or if you don’t like eBay then there will be third party vendors near your location who sell these US iTunes gift card. They aren’t hard to find so you shouldn’t have problems with this step.
The gift card is basically a code that you can redeem on iTunes to buy applications and other stuff like books and TV shows.
Conclusion
Congratulations. Now you can enjoy US version of iTunes. You have achieved your goal. Now it’s time to live your dreams.
Before we say farewell, remember, to never use your own credit card on US version of iTunes.
Don’t buy iTunes cards from buyers that have no reputation or unknown sellers. Some shady eBay sellers sell the same iTunes card to many buyers.
This is where having friends or family in the US can really help. They can help you get iTunes gift card through which you can buy whatever you want on iTunes.
Need more help? Don’t forget to use the comments section.